15. Establishing Secure Connections
Contents
15.1. Overview
The Performance Co-Pilot includes facilities for establishing secure connections between remote collector and monitoring components.
All connections made to the PCP metrics collector daemon (pmcd) are made using the PCP protocol, which is TCP/IP based.
The cryptographic services used to augment the PCP protocol are provided by Network Security Services (NSS), a library implementing Transport Layer Security (TLS) and the Secure Sockets Layer (SSL) standards, and base cryptographic functions. NSS includes a software-based cryptographic token which is FIPS 140-2 certified.
Both the pmcd and pmproxy daemons are capable of simultaneous TLS/SSL and non-SSL communications. This means that you do not have to choose between TLS/SSL or non-SSL communications for your PCP Collector systems; both can be used at the same time.
To check local PCP collector installation (requires the pcp-verify utility):
$ pcp verify --secure
15.2. Enabling TLS/SSL: Steps Involved
Before the PCP Collector system can be requested to communicate with TLS/SSL, certificates must be properly configured on the Collector Server host.
This typically involves:
Obtain and install certificates for your PCP Collector systems, and configure each system to trust the certification authority’s (CA’s) certificate. Alternatively, the less secure option of generating a self-signed certificate may be appropriate for installations where using trusted certificates is impractical. This tutorial uses the latter approach.
Enable secure connections in the pmcd and pmproxy daemons by configuring the system certificate database with the PCP Collector certificate.
Ensure that each user monitoring a PCP Collector system obtains and installs a personal certificate for the tools that will communicate with that collector.
This can be done by manually updating a monitor-side certificate database, or automatically by reviewing and accepting the certificate delivered to the monitor tools during the first attempt to access the PCP Collector system.
The process of obtaining trusted certificates is beyond the scope of this document, and will differ depending on whether the certificate authority is internal or external to your organisation. Refer to the chapter titled “Requesting and Receiving Certificates” in the Certificate System Admin Guide for details on managing trusted certificates from a certificate authority.
However, at a high-level: a certificate request (CR) must be generated, then sent to the certificate authority (CA) you will be using. The CA will generate a new trusted certificate and send it to you. Once this certificate has been received install it in the system-wide certificate database as described below.
15.3. Collector Setup
All PCP Collector systems must have a valid certificate in order to participate in secure PCP protocol exchanges. Certificates are stored in a certificate database, and can be created using certutil (an NSS tool).
In some (non-default) configurations the system certificate database may be protected by a password. Should you choose to select this (non-default) option, by placing the certificate database password in a file the server can still be started as a regular service (i.e. automatically at bootup or otherwise running unattended). This password is stored in clear text within the password file, so its usage represents a significant security risk. Because this password is stored in plaintext, the password file should be owned by the user account under which the PCP Collector system runs. By default this is the “pcp” user. It must be set as read-only for this user and allow no access to others (mode 0400).
Create a system-wide NSS database in a privileged (root) shell, only if it does not exist already:
# ls /etc/pki/nssdb
ls: cannot access /etc/pki/nssdb: No such file or directory
# mkdir -p -m 0755 /etc/pki/nssdb
# echo > /tmp/empty
# certutil -d sql:/etc/pki/nssdb -N -f /tmp/empty
# chmod 644 /etc/pki/nssdb/*
certutil is part of many modern software distributions, and can also be downloaded from the Mozilla NSS project.
At this stage we have a valid (possibly empty) NSS database for our collector certificate. A list of all installed certificates can be obtained using the -L option to certutil, as follows:
$ certutil -d sql:/etc/pki/nssdb -L

Certificate Nickname                                         Trust Attributes
                                                            SSL,S/MIME,JAR/XPI

[...certificates list, possibly none at this stage...]
Certificates should now be requested from your local trusted certificate authority (CA). Alternatively, it is possible to generate a “self-signed” certificate as follows, using the -x option to certutil.
After customising the certificate subject names (-s and -8 options below), in a privileged shell enter:
# certutil -d sql:/etc/pki/nssdb -S -x \
    -n "Local CA certificate" -s "cn=Local PCP Installation, dc=YOUR,dc=DOMAIN,dc=NAME" \
    -t "CT,," -v 120

# certutil -d sql:/etc/pki/nssdb -S \
    -c "Local CA certificate" \
    -n "PCP Collector certificate" -s "cn=PCP Collector" -8 "YOUR.HOST.NAME,ALT.DNS.NAME,..." \
    -t "P,," -v 120
Note
You must customise the parameters - YOUR, DOMAIN, NAME, YOUR.HOST.NAME, ALT.DNS.NAME above in upper-case. If you are not using self-signed certificates, you will also need to customise the black parameters above to match certificate details provided by your CA. Finally, you may also wish to change the -v setting, which sets the certificate expiry timeframe. certutil defaults to 3 months, the example above sets expiry in 10 years (120 months).
At this stage, attempts to restart the PCP Collector infrastructure will begin to take notice of the new contents of the certificate database. If we earlier chose to create the system-wide database in the non-default configuration of having a password, we must now configure pmcd and pmproxy to make use of it. This configuration must be performed in the $PCP_PMCDOPTIONS_PATH and $PCP_PMPROXYOPTIONS_PATH files, as recorded in /etc/pcp.conf, using the -P <path> option to these daemons. Detailed diagnostics are available in the daemon log files, located below $PCP_LOG_DIR.
15.4. Monitor Setup
PCP Monitoring (client) tools require a trusted certificate to validate the server in a TLS/SSL connection. This certificate can be installed beforehand or can be delivered via the TLS/SSL connection exchange. In the latter situation, the user is prompted as to whether the certificate is to be trusted (see example below).
Once certificates are in place, we are ready to attempt to establish secure connections between remote PCP Monitor and Collector hosts. This can be achieved by specifically requesting a secure connection for individual host connections, in tools that support this explictly (e.g. pmchart below). Alternatively, an environment variable can be set to request that all client connections within that shell environment be made securely. This environment variable can have the value enforce meaning “all connections must be secure, fail if this cannot be achieved”, or relaxed meaning “establish secure connections only for remote collector systems that are configured, fallback to insecure connections if not”.
Using the approach of certificate delivery via the TLS/SSL protocol, the database and certificate will be automatically setup in the correct location on your behalf.
To establish a secure connection, in a shell enter:
$ export PCP_SECURE_SOCKETS=enforce
$ pminfo --host YOUR.HOST.NAME -f kernel.all.load

WARNING: issuer of certificate received from host YOUR.HOST.NAME is not trusted.
SHA1 fingerprint is 34:92:D2:DC:DE:28:3A:2D:DD:B9:1A:6C:C9:51:1E:B8:FA:CE:63:51
Do you want to accept and save this certificate locally anyway (y/n)? y

kernel.all.load
    inst [1 or "1 minute"] value 1.26
    inst [5 or "5 minute"] value 1.29
    inst [15 or "15 minute"] value 1.28
At any time, you can query the certificates you have installed locally for remote collector hosts.
To list the locally installed server certificates, in a shell enter:
$ certutil -d sql:$HOME/.pki/nssdb -L

Certificate Nickname                                         Trust Attributes
                                                            SSL,S/MIME,JAR/XPI

PCP Collector certificate                                    Pu,u,u
PCP Collector certificate                                    Pu,u,u
PCP Collector certificate                                    Pu,u,u
PCP Collector certificate                                    Pu,u,u

$ certutil -d sql:$HOME/.pki/nssdb -L -n 'PCP Collector certificate' | grep 'DNS name:'
When listing by nickname, this provides a detailed certificate list, so using an output filter as shown above can be handy to report only the hostnames.
Alternatively, using the manual approach, first use certutil to ensure a user database exists, then export either the CA or the collector certificate in ASCII format for the PCP Collector system we wish to monitor and finally import it into the user database.
Step 1: Create a local user NSS database in a command shell, only if it does not exist already:
$ ls $HOME/.pki/nssdb
ls: cannot access .pki/nssdb: No such file or directory
$ mkdir -p -m 0755 $HOME/.pki/nssdb
$ test -f /tmp/empty || echo > /tmp/empty
$ certutil -d sql:$HOME/.pki/nssdb -N -f /tmp/empty
Step 2: To export the collector system CA certificate as ASCII, in a shell enter:
$ certutil -d sql:/etc/pki/nssdb -L -n "Local CA certificate" -a > /tmp/ca-certificate.asc
Step 3: To import the certificate as ASCII on a monitor system, in a shell enter:
$ certutil -d sql:$HOME/.pki/nssdb -A -n "Local CA certificate" -t "CT,," -a -i /tmp/ca-certificate.asc
Note
Cunning use of this trusted certificate could be used as the root certificate for many hosts in an environment, and a single certificate could then be installed on a monitor system allowing access to a group of hosts.
15.4.1. Graphical Monitor Tools
In the PCP strip chart utility pmchart from version 1.5.7 onward, secure connections can be established using the “Add Host” dialog. This can be accessed via the “New Chart” or “Open View” menu entries.
Specify the name of the PCP Collector system where pmcd is running.
Press the “Advanced…” button in the bottom left.
Select the “Secure” check box.
If the nss-gui application is installed, the “Certificates” button can be used to inspect and administer locally installed security certificates.
Press “OK” to establish a new secure connection to the host.
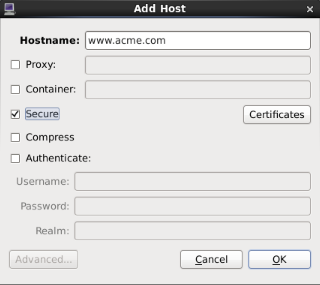
Figure. Add Host dialog
Note
It is not necessary to use the PCP_SECURE_SOCKETS environment variable described above with pmchart. However, if it is used, secure connections will become the default mode for all connections established by pmchart too.